How to add custom fonts to your Squarespace website (update 2025)

Your website is often the first impression guests have of your vacation rental — long before they ever arrive. The right fonts set the tone of your brand, whether it’s luxurious, coastal, modern, or somewhere in between. Typography carries personality and communicates the mood of your property instantly.
Using custom fonts helps your brand feel cohesive across your logo, brand elements, socials, and your website. plays a critical role in user experience, performance, and design. So while custom fonts are beautiful, they should be used thoughtfully on your website.
When choosing fonts that match or complement your brand, stay minimalistic.
Choose 1 - 3 fonts:
One font for Headings
One font for paragraphs/body copy
If really needed, an optional accent font (used sparingly)
Too many fonts can be visually distracting and can also slow down your site speed.
You can find some of my favorite fonts below or on my resources page.
☞ Latest update (October 2025)
How to now easily add a favorite custom font to your website so that it’s matches your gorgeous brand!
Squarespace finally introduced a simple, built-in way to upload and manage your own fonts directly in your website, without code! This is now the easiest and fastest method.
NOTE: Always make sure you have the correct licensing for any custom font you use on the web.
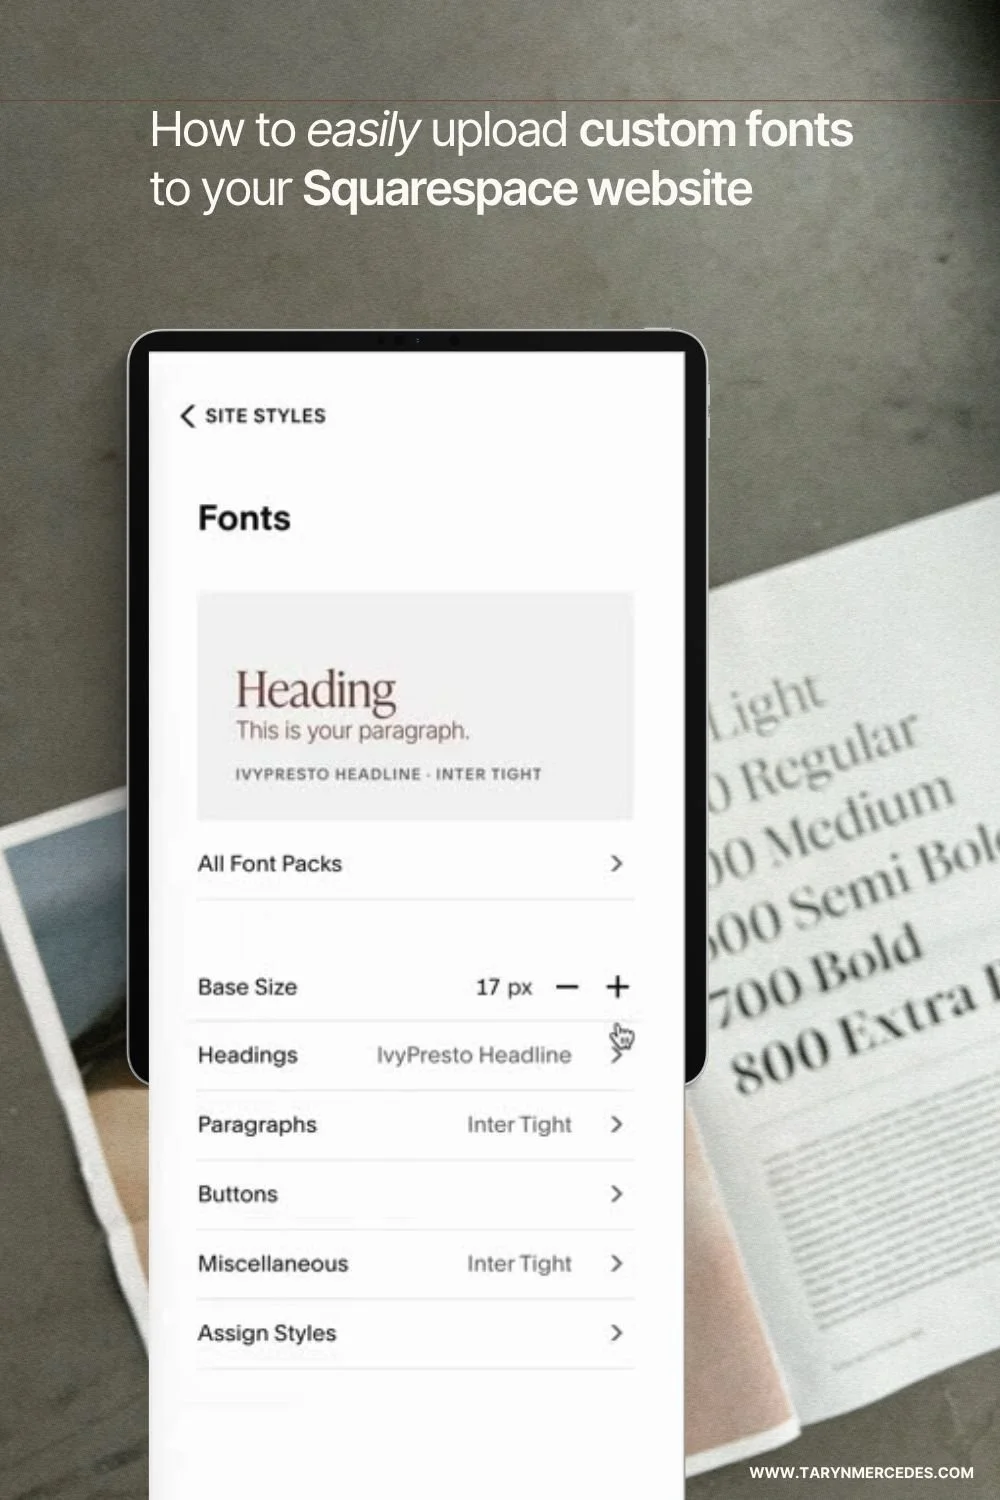
The new simple way to Upload Custom Fonts
In edit mode, from the Home menu, use the Search icon to find Site Styles.
From there, choose Fonts from the Site Styles menu. Click on Headings or Paragraphs, then click on Font at the top.
(See video to see steps in action.)
Upload your font files.
You can upload or drag and drop
.otf,.woff, or.woff2files.(When possible, choose a
.woff2file which is the most recent font file version developed by Google and is considered the best format for its smaller file size and better performance for loading on modern browsers.)Upload all font variations that you will actually use, such as Regular, Italic, Bold, etc. Squarespace automatically recognizes the different weights and will organize them with the same font family name.
Assign your font styles.
Once uploaded, your custom font will appear in the dropdown font menus. You can easily apply it to headings, paragraphs, buttons, and navigation links — no code needed!
Keep it minimal.
Upload only the fonts and styles you’ll use. Too many fonts and variations can slow down your site’s load time.
Preview and test.
Check your site on desktop, tablet, and mobile to make sure your fonts look crisp and readable across all devices.
Deleting fonts.
Remove fonts you no longer need.
In the Font menu, click the X next to the font you uploaded and are no longer using. If the font is still being used, Squarespace will prompt you to remove it first.
I have left the original and previous updates to this blog post below, just in case you still needed to know. 😉
Update for adding fonts via CSS Custom Code:
There is a fabulous free tool for effortlessly adding custom fonts! Custom FONTwiz was created by Squarestylist so you can easily add your favorite custom font to your Squarespace website. You are guided in a detailed video through all the simple step-by-step’s to quickly and easily generate and add the necessary CSS codes. Read more on how to add custom fonts using FONTWiz on the Squarestylist blog.
The following is the tutorial that was previously shared on how to add custom fonts to your Squarespace website, including how to generate web-safe fonts.
Upload your custom font.
First, make sure you have the rights to your custom font for web usage.
For a paid font, you will need to make sure you have a web-use license. There are also lots of free fonts, such as Google fonts, that are web-safe fonts.Now you need to make sure you have the correct files for your webfonts.
If you purchased a font for web use, then you should have been provided with the webfont files — .woff and .woff2. If you’re using a free font that allows web use, but only includes the .otf or .ttf formats, then you will need to use a Webfont Generator, such as Font Squirrel, to create a webfont kit that creates the .woff and .woff2 font formats for optimized web use.Add your webfont to your site.
From your Home menu, go to Website / Pages.
Scroll to the bottom of the menu to access Website Tools / Custom CSS.
Click on the arrow next to Custom Files.
(On Squarespace 7.0, click on the Manage Custom Files button at the bottom.)
Click on the + to Add images or fonts and upload your font file. You only need to include the .woff2 file which is the most recent version developed by Google and is considered the best format for its smaller file size and better performance for loading on modern browsers.Now your font is successfully uploaded to your Custom Files.
Add Custom CSS code.
Now that your font is uploaded, you will need to add some custom code to your site. I promise it’s not as hard as it might sound! :)
From the Custom CSS menu, copy and paste the code below.
(If there is already code included in your Custom CSS panel, with your cursor at the top hit enter a couple of times and add this code starting at line 1.)@font-face { font-family: 'YOURFONT'; src: url(' ') format('woff2'); }
Once you have added the CSS code above, you will need to add the font-family name in place of ‘YOURFONT’
For example, if I wanted to add the custom font Seriously Nostalgic, the code for that line would look like this: font-family: ‘Seriously-Nostalgic’;Next is adding the url that corresponds to the uploaded webfont files. To add the url, place your cursor in between the ‘ ‘ and then click on Custom Files. Click on the .woff2 font file that you already uploaded. You should now have an ‘https://…’ url included and should look similar to this:
src: url('//static1.squarespace.com/static/60be2ba8f/t/60af8a1ab12e91f61ec36/162891078/seriously-nostalgic-regular-webfont.woff2') format('woff2'),Repeat the steps above one more time to add the .woff font file to the css code url(' ') format('woff');
Now it’s time to change the heading and paragraph styles. Heading style codes are h1, h2, h3, h4 (Squarespace 7.0 does not have an h4 style). The body or paragraph text style code is p (Squarespace 7.1 has three paragraph styles — the codes are .sqsrte-large for paragraph 1, p for paragraph 2, and .sqsrte-small for paragraph 3.)
Use the code below to assign a heading, or all headings, and/or paragraph styles to your new font-family. The font style will change on your site as you update the CSS code.
h1, h2, h3, h4, p { font-family: 'YOURFONT'; }
Click Save and enjoy your beautiful website with your custom fonts!
To add another custom font, follow the steps above to upload and add a new webfont file to your Custom CSS.
It’s best to minimize the number of custom fonts you use on your site as they will contribute to a slower website loading time, so consider using as few fonts as possible.
How to add an accent font
It’s a nice design element to use a display or accent font, such as a fancy script (or cursive) style. However, please use these sparingly! They are called display fonts for the purpose of being displayed as a design element only.
Follow these steps to style your headings with your accent font:
In Site Styles (click on the paintbrush icon in the top right corner), go to Fonts / Miscellaneous.
Choose your accent font and styles.
Save and Exit.
From the home menu, go to Website / Pages and scroll down to Website Tools / Custom CSS. Add the following Custom CSS code to the top of the CSS code window or below any custom fonts that you have just added:
h1 em, h2 em, h3 em {
font-family:var( --meta-font-font-family);
font-style: normal !important; }
Save.
To use your accent font, in Edit mode, select the word(s) in a heading that you want to accent and choose I (italic). The accent font style will then be applied to the italicized word(s).
For more font styling info, check out the blog post on choosing fonts for your Type Suite and setting your type hierarchy to boost your SEO.
My favorite fonts
A couple of my current font faves that I’ve recently added to my font addiction collection are:
Editor’s Note and Essential Sans by Jen Wagner Co. — use code TARYNMERCEDES for 15% off*
(These are affiliate links. I may receive a small commission for any purchases you make through these links at no additional cost to you, of course.)Seriously Nostalgic and Superfreak by Nicky Laatz
To see these fonts in action, check out my reel on Instagram.
Save to Pinterest ♡